
Rocker Locker Installation Tips
We are working on a full detailed install video, but here's some written tips and important notes in the meantime! Any other questions, as always feel free to reach out.
Tools Required
- Sharpie of fine tip marker
- Centerpunch
- Power drill with sharp drill bits
- Airsaw (our preference) or jigsaw with fine tooth metal cutting blades
- Wrenches for tightening the nuts (11/32" Wrench & 8mm Wrench for Hinge Nuts)
- Painters Tape
- Masking Paper can be helpful
- Isopropyl Alcohol to clean inside cavities
- Paper Towels or shop rags for cleaning
- Black Spray paint if you want to paint the inside
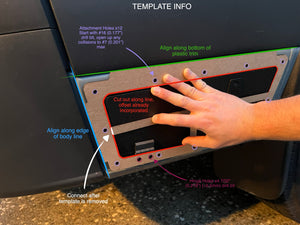
Updated Drill and Cut Template
Rather than using the inner pieces as the template we've now included 2 think cardboard templates. Why 2? Well just in case one gets damaged on the first side.
!IMPORTANT: Once the locations are marked it's very important that you follow proper drilling best practices to ensure holes are centered and in the correct place. There is not a lot of margin for error here, so if you don't feel comfortable or confident or have the right tools, professional installation is highly recommended. Moonraker Design Co. will not be held responsible for incorrect installation.
- Centerpunch each hole location
- Center drill or pilot drill with a nice sharp small split tip cobalt drill or purpose made center drill.
- Drill to size using the recommended drill sizes below.
- Debur the front & most importantly back side of the hole.
- Apply anti-corrosion treatment after test fitting. Our preferred is Rust Bullet.
Mounting the Trim
The first nut you should put on is the top most front. It's pretty difficult to get started. You can check the video here for how best to do it. All the others are pretty easy. Tighten them all a bit at a time to get a uniform compression.
Installing the Hinges
It's important to use the included anti-sieze on each of the hinge studs prior to installing the nuts. This will prevent galling from the same material types.

